Showing posts with label Bunzlau. Show all posts

Saturday, 3 May 2014

Bunzlau for Lasalle. The full report


I have uploaded the full Scenario and the After Action Report (AAR) of the combat of Bunzlau (August 30, 1813). You can watch the development of the battle that resulted in a drawn battle: a dogged defense allowed the French to retire  unmolested, leaving the battlefield and an intact bridge over the Bober to the Allies, by following the instructions to use the visor.

The next project will be the combat of Pitschenberg, fought some days after, when Napoleon himself took the offensive leading the forces of the Army of the Bober against the Army of Silesia.
Watch this space!


Share |

Monday, 21 April 2014

How difficult is to find a ford?

During the Bunzlau scenario, the Karpov's Cossacks were trying to find a ford upstream the watermill. If they had found it, they could have crossed the river Bober outflanking the French defense.
Although the capabilities of irregular cavalry units in Lasalle are quite limited (despite my home rule), the presence of this force in the area had surely hampered the French defense of the bridge and would have contributed, in combination with the frontal attack of Prussian infantry, to the Allied victory.
To find a ford, the Cossacks were to be in contact with the river for a full turn without doing anything else, and roll a die. A result equal or greater than 4 would mean that a ford had been found, and the Cossacks could have passed the river the next turn. However, they were seeking for a ford for 6 consecutive turns with negative results!
The chances of such an event can be found by means of statistics. The problem is based on the binomial distribution, B(n,p), that gives the probability of the number of successes in a sequence of n independent yes/no experiments, each of which yields success with probability p. In our case, n=6 and p=0,5 (a ford is found by rolling 4, 5 or 6 with 1D6). Using the adequate formula, the probability to achieve 6 failures in 6 successive rolls can be calculated as 0,5^6 = 0,015625 = 1,56%.
The Cossacks were really unlucky!

Sunday, 20 April 2014

The fight at Bunzlau is over

While the French and Baden cavalry was stopping the Russian infantry in the central ford, the Prussian horse artillery was keeping a duel with the French foot artillery at the southern ford, which ended with the dismounting of the latter.

The 5/9e Foot Artillery is broken by the explosion of a caisson
and 1 hour later, the 10/2e Foot Artillery suffers the same fate!
Meanwhile, the infantry of the Prussian advance guard is making a last effort at the bridge sector, after a brief and ineffectual artillery support.
The 4/65e routs the 2/Leib Regiment that falls back...
... but the Prussian infantry charges one more time, only to be routed again (a tie so the defender wins)...
.. leaving the 4/65e Ligne almost broken (only one morale point left) but triomphant
This is too much for the Allies, and the French retire almost unmolested, covered by their light cavalry!
Losses:
French: 1/9e Legere; 3/50 Legere; 19/7e Foot artillery (5 points plus 17 points of losses currently on the table)
Allies: 1/49th and 2/49th Russian Jaegers; Kamchatka IR; Fusiliers/Leib IR (8 points plus 8 points of losses currently on the table)
The final result can be considered a draw: The French have less losses but the Prussian are the masters of the battlefield and the bridge over the Bober is intact.
This is a good result for the French after their rout at the Katzbach!


Share |

Saturday, 19 April 2014

The fight at the ford

Whereas the Prussian advance guard was trying to take the bridge over the Bober to catch the French rearguard, another Russian column has probed for and found a ford downstream.

The Prussian Jaegers have found the ford...
... and immediately cross the Bober, screenig the Russians Jaegers
The Baden Dragoons charge the Russians (the Jaegers have recrossed) but are unable to break the unformed infantrymen...
Afterwards, the Russians cross again in forcé (under the cover of the nearby Russian artillery)...
The full 23rd Light Cavalry Brigade charges again: the 10e Hussasrs are rejected...
... but the Baden Dragoons break the other Russian square
The French-Baden cavalry is master of the area, while the Russian square remains isolated in the wrong bank of the Bober

The time is passing by and the Allied are not being able to cut through the French rearguard.
The end is near!


Monday, 14 April 2014

The bridge at Bunzlau

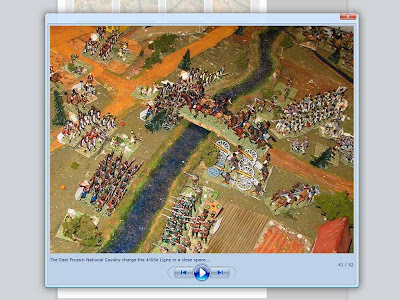
The battle of Bunzlau is again on the way! The final result is still undecided, but the fight around the bridge over the Bober River is proving quite bloody. The bulk of the 11th French division has withdrawn to the left bank, after losing the 1/9e Légère Regiment, defeated by the East Prussian National Cavalry (see the previous post).
However, the 3/50e Ligne Regiment has defeated the assault of the Fusilier battalion of the Leib Regiment that has been broken, as well as a subsequent charge of the East Prussian National Cavary Regiment that has been also pushed back.

The 3/50e Ligne rejects the Fus/Leib Regiment ...
...and run for the Prussians and break them!
The East Prussian National Cavalry regiment charges the triomphant French...
... only to be stopped and forced to fall back
Although the result of the two hand-to-hand combats seems logical, maybe my Lasalle home-rule for assault in defiles is too biased towards the defenders. The current rule is as follows:

Assault of defiles (optional)
1) A column of march can assault a defile like a bridge, a fortified gate, a fort, etc. It represents not only true march columns, but also all those formations with reduced front.
2) It fights at 1/2 dice and with no previous shooting, adding a -2 for "bad terrain" as they will be fighting in cramped quarters.
3) The enemy can use the "cover" or "higher elevation" modifiers when applicable.
3) However the small front, the enemy never halves their dice.

As the rule cannot be changed until the battle is finished,  the Prussians must try other options (artillery close support?) in order to take the bridge in good state (i.e. intact).

Watch this space!


Sunday, 9 February 2014

The baptisme of fire of the Prussian National Cavalry Regiment

Again and again, the most recent and carefully researched and painted wargaming units have an embarrassing affaire (i.e a rout!) in their first encounter on the tablegame. That was the case with the Russian Soumy Hussars and the fashionable French 5th and 9th Hussar Regiments.
The Prussian National Cavalry (PNC) has suffered the same fate during the first moves of the on going Bunzlau scenario, as shown in the below pictures

The PNC regiment cover the right flank of the von Katzler's flank guard
The 1/9e Legere Provisoire Regiment fires a long distance volley over the PNC without effect
Triggering the PNC charge, but the Prussians are rejected by the French in square formation
The PNC is forced to fall back with some disorder
Meanwhile, the battle is raging in other zones of the tablegame
Watch this space!


Sunday, 2 February 2014

Bunzlau. The terrain

The actual shape of the terrain for Bunzlau has been slightly changed: the available elements, i.e. terrain tiles and river, stream and road sections, do not allow to follow exactly the initial design of the table (see this post). Is the fog of war in action!
See below the corrected map, as well as some pictures of the actual table


Watch this space!


Share |

Saturday, 4 January 2014

Bunzlau. The rules for the Scenario

Terrain
The River Bober is only passable at bridges and fords. There are two possible fording areas, that can be probed by any touching infantry or cavalry unit. A ford is found with a D4+.
The stream and woods are rough terrain for cavalry and infantry, and impassable for artillery, which only can cross the water courses at the bridges, and the woods by the road.
Each built-up area may contain one infantry unit.

Duration
The basic duration of the game is 24 turns (3 hours). Seven dice are used, instead five, to test Army Moral. Bonus Turns are allowed rolling 2D6 (p. 66 of the e-Lasalle book).
(3) The Prussians are the attackers and the first side.

Deployment and Reinforcements
French units
The Brigade Valory (11th Division), acting as the last rearguard, can be deployed anywhere east (right bank) of the River Bober, including Bunzlau itself. The rest of the 11th Division, can be initially deployed anywhere in the west (left) bank of the Bober with the artillery limbered. The cavalry must be in the C1 area.
French reinforcements may enter (deployed or not) at A1-B1-C1 (20%/50%/30)
Prussian units
Von Katzeler’s flank guard is on the table at the start of the game deployed in the C5-D5 area. Von Zeppelin’s first line will enter at B5 in the 3rd turn and von Weltzein’s second line in the 5th (30%), 7th (60%) or 9th (100%) turn, at the A5-B5-C5 area.
Allied reinforcements may enter at C5-D5 (40%/60%)
All reinforcements follow the Lasalle arrival rules (p. 91 of e-Lasalle).

Destroying the bridge (Modified from “Lasalle”)
The French sapper detachment force must be in contact with the bridges for demolition. The large and small wood bridges require, respectively, two (successive) and one engineering tests to start burning (D4+). The fire can be extinguished by one (Prussian) infantry unit wasting one full turn in contact with the burning bridge. That unit cannot fire and will fight at disadvantage, halving its dice if caught in hand-to-hand combat. A fire burning during more than two successive (Prussian) turns will render impassable any bridge.

Assault of defiles (optional)
1) A column of march can assault a defile like a bridge, a fortified gate, a fort, etc. It represents not only true march columns, but also all those formations with reduced front.
2) It fights at 1/2 dice and with no previous shooting, adding a -2 for "bad terrain" as they will be fighting in cramped quarters.
3) The enemy can use the "cover" or "higher elevation" modifiers when applicable.
3) However the small front, the enemy never halves their dice.

Optional rule: Irregular cavalry (Cossacks)
1) Irregular cavalry units may charge enemy units standing in 'limbered' or 'column of march' formation in open terrain.
2) Irregular cavalry units must to pass a 'Discipline' (D4+) test to initiate the charge in open terrain.
3) If routed in 'decisive combat', the irregular cavalry unit is immediately broken.

Small irregular Prussian units (to be tested)
The Prussian Jaeger units (line and guard) only have two elements, so are in disadvantage in hand-to-hand combat with larger units and will fall back automatically if charged (no morale test is necessary). They can only initiate combat against unprotected artillery batteries or wagon train units. However their small size and because of their marksman ability, these units have a full SK3 capacity in the fire step (when firing or fired upon).
This rule is included to test for the presence of small, high morale and specialized units, such as Prussain Guard Jaegers and similar.

Victory conditions
The French aim is to retreat after breaking the bridge over the River Bober, while the Prussians should try to avoid it maintaining open the pass over the Bober Therefore the bridge in B3 is an Objective, while intact and the rules of p. 67 and 91 (e-Lasalle) are of application if the bridge is in Prussian hands (use 6 dice instead 4). If the bridge is broken by the French, the Objective rules are not applied.


Share |

Wednesday, 25 December 2013

The Bunzlau map

The fight at Bunzlau (present day Bolesławiec in Poland) was centered around two wooden bridges connecting the banks of the Bober to a river island, surrounded at west by the main river branch and at east by a small channel or millrace (German Mühlengraben). This island and a small hill, dominating the town from the south and the west (left) bank of the river, were the most dominant geographical features of the battlefield (see a map in this post).
Below you can see the area to be depicted in the tablegame. The red square shows the area covered by my tablegame at the same scale (1:1,000) than the map, The black square covers a larger area, that is necessary to include in the table the features playing a significant role in the fight.

Actual old map with the gametable at a correct (red) and an decreased (blac) scale
However, a further distortion was made to reduce the northern area where no fight took place, by the simple expedient of enlarging the map in the vertical dimension. The resulting and distorted (both in scale and shape) map is the following:
Actual map after enlarging the vertical dimension to reduce the non-significant northern zone
At last, the below picture shows a diagram of the table map, before to laid the actual scenery features (the fog of war can modify slightly the shape and position of some features). Some "possible fords" have been included, to add more spice to the game

Next, the rules for the Scenario


Share |


Sunday, 22 December 2013

Scenery time. A watermill for Bunzlau (and III)

The construction of the watermill for Bunzlau has continued in my spare time. You can see below more pictures of the making of

The full set before the addition of the wheel
The finished watermill
Idem
The destroyed version
The watermill from above
Idem
The surrounding walls are made from cardboard covered with stone textured paper. The two wall sectors are reversible and, being not fixed on the base, can be placed in two configurations, accomodating inside a garrison comprising until two 1 inch-square infantry bases.
The watermill is finished!


Share |

Monday, 16 December 2013

Scenery time. A watermill for Bunzlau (II)

The making of the watermill is on way. See below some pictures of the process

The watermill stucture
The millrace outline
The watermill cut in 2mm-cardboard
The mounting of the watermill
The millrace outlined with plasticine
The 'ruined' version of the watermill mounted
Another view of the 'ruined' version mounted on the millrace
The 'normal' version of the watermill placed over the 'ruined' version
The millrace piece after application of sand
The watermill and its decoration
To be continued...


Share |

Sunday, 15 December 2013

Scenery time. A watermill for Bunzlau (I)

While making the research (grandiloquent term for a rapid reading of some old Google books) for Bunzlau, I noted in the narratives of the combat the important role played by a small wood bridge 'dominated by a watermill' and connecting the right bank to an island. Afterwards, when searching for an old map of the area, I arrived to this Polish Map Repository site from which I downloaded the below map of the Bunzlau/Bolesławiec area in 1943.

By zooming in the area of interest, the features of the 1813 battle field become apparent. Below you can see the island between the main branch of the Bober River and the millrace, labeled  Mühl. Gr. i.e. Mühlgraben, on the map.

Immediately, the wargamer in me had the old feeling: 'I must to build a watermill', so I started a frenetic google search by using the terms "watermill" and "wassermühle". You can see below some of my findings, including both real and model items:
The last one, depicting a real water mill located in Rheda (Germany) was my final inspiration

To be continued!


Share |